Mapping with the MIT Racecar
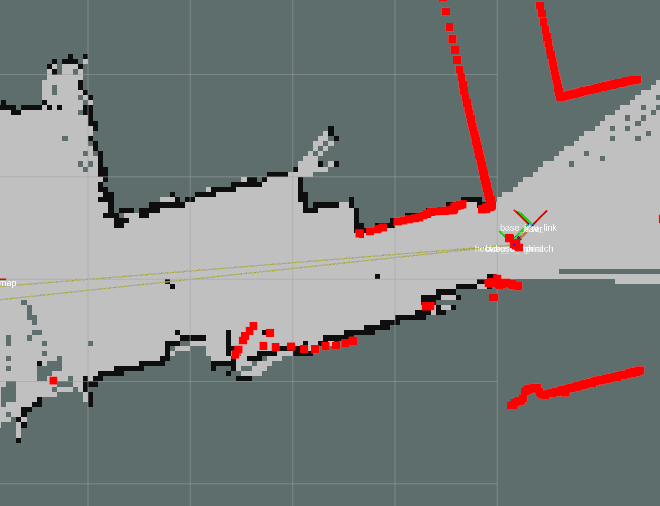
Now that the lidar works, it’s time to map my apartment! I made the map by driving the racecar around in teleop mode, recording the lidar with rosbag, and generating the map offline. Here’s how it works.
Lidar Preprocessing
In early iterations of my experiments, I noticed that the lidar recorded collisions with the racecar frame. This led to the mapping algorithm leaving a little trail of obstacles as the racecar moved. Very unprofessional.

To fix this, I added a box filter using the laser_filters package. A box filter removes any scans within a specific rectangle, so I filtered out all scans within the racecar itself. Then I updated the lidar node to publish to scan_raw, and created a filter node to read that topic and publish to scan.
Here are the changes I made:
# sensors.yml
laser_filter:
  tf_message_filter_target_frame: laser
  scan_filter_chain:
  - name: box
    type: laser_filters/LaserScanBoxFilter
    params:
      box_frame: base_link
      min_x: -0.05
      max_x: 0.15
      min_y: -0.15
      max_y: 0.15
      min_z: -0.2
      max_z: 0.2
# sensors.launch.xml
<!-- laser filter -->
<node pkg="laser_filters" type="scan_to_scan_filter_chain" name="laser_filter">
<remap from="scan" to="scan_raw" />
<remap from="scan_filtered" to="scan" />
</node>Gathering Data
Once the lidar data looked good, I recorded a run through my apartment to generate a map. High pitch angles can warp 2D lidar data, so I focused on making the robot move smoothly. I used rosbag to record the lidar data.
rosbag record -O apartment.bag /scan
I didn’t have to record the tf topic because the mapping launch file includes the static transform publishers. In fact, mapping failed when I recorded tf because the laser_scan_matcher needs to generate its own odom frame data.
Mapping
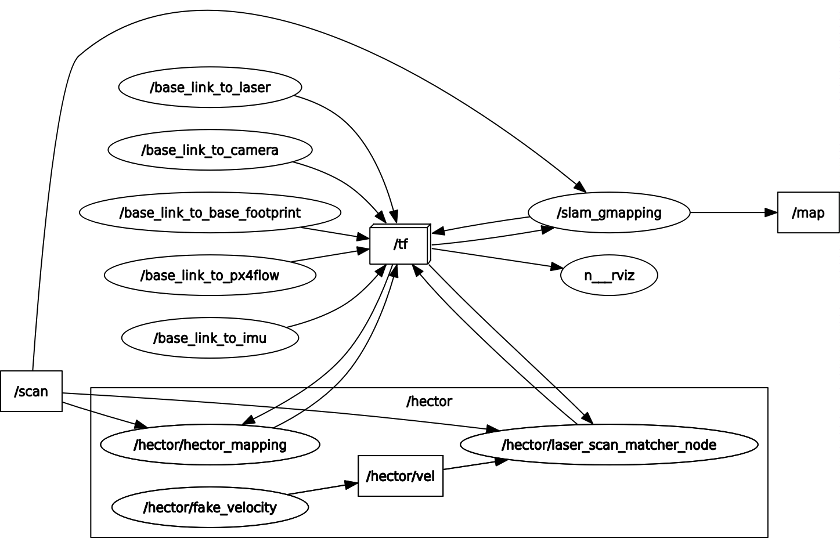
The actual mapping process uses three different packages: laser_scan_matcher, hector_mapping, and gmapping. Note that the static transforms are included too.

First, laser_scan_matcher compares the lidar scan history to estimate the robot’s movement and publish a scan_match frame. This works pretty well with just lidar even though the docs recommend adding an IMU or a separate odometry estimate.
Second, hector_mapping takes the lidar data and scan_match frame and creates its own odom estimate on the hector_map frame. This second layer creates a slightly better odometry estimate.
Last, gmapping takes the refined hector_map odometry estimate and generates a map from the lidar data. Using multiple mapping systems allows gmapping to work with a high quality odometry estimate and make the best map possible.

Next Steps
Even though I made a great map of my apartment, the mapping launch file still doesn’t use the IMU. Since it explicitly remaps the imu topic, I assume that updating it to use the IMU correctly is part of the actual MIT class. I keep seeing weird quirks like that in this repo, and I’m never sure what’s deliberate and what’s part of an assignment.
I considered getting rid of hector_mapping completely. The laser_scan_matcher seems to generate a great odometry estimate on its own, and gmapping works great by itself. Using fewer packages and tuning them better would be easier to understand too.
Notes on Installing Packages
Most of the packages I used aren’t officially supported on Melodic yet (they all worked fine for me!), I had to clone their git repos and build them locally.
hector_mapping, gmapping, and laser_filters
The MIT racecar uses a combination of hector_mapping and gmapping, neither of which is officially supported on Melodic.
cd ~/racecar_ws
git clone https://github.com/ros-perception/slam_gmapping.git
git clone https://github.com/ros-perception/openslam_gmapping.git
git clone https://github.com/tu-darmstadt-ros-pkg/hector_slam.git
git clone https://github.com/ros-perception/laser_filters.git
cd ..
rosdep install --from-paths src --ignore-src -r -y
laser_scan_matcher
I had to install laser_scan_matcher from source as well, and I built its csm dependency following the instructions here.
cd ~/racecar_ws
git clone https://github.com/ccny-ros-pkg/scan_tools.git
git clone https://github.com/AndreaCensi/csm.git
cd csm
cmake -DCMAKE_INSTALL_PREFIX:PATH=/usr/local .
make
sudo make install